The Point of Sale (POS) module in PTPShopy revolutionizes the way merchants handle transactions, allowing direct acceptance of cryptocurrency payments within their stores. Unlike traditional systems, this innovative feature stands out for its ability to process over 400 cryptocurrencies, offering a versatile platform for diverse customer preferences. It also allows businesses to manage several stores from a single account, prioritizing security measures to ensure safe and seamless transactions. To begin using the PTPShopy’s POS module, follow the steps below:
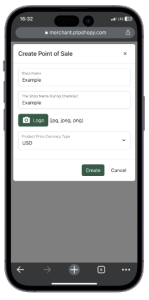
1. Login and Create New Point of Sale
To begin, log into your PTPShopy Merchant Account. Access the Point of Sale section, click on actions and proceed to create a new point of sale. Input essential details such as the shop’s name, logo, brand, and the chosen display currency.
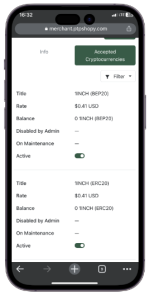
2. Select Accepted Cryptocurrencies
In the section labeled ‘Accepted Cryptocurrencies,’ specify which cryptocurrencies you wish to accept as valid forms of payment within your store. In this example, 1INCH (BEP20) and 1INCH (ERC20) were selected.
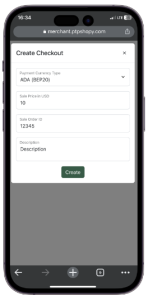
3. Create Orders for Products/Services
After you have set up your shop, you can begin creating orders for your products or services by clicking on the ‘Create Checkout’ button. In the checkout window, you will need to enter the necessary details, including the currency, sale price, order ID, and a description of the product or service. Once you have entered all of the necessary details, click on the ‘Create’ button to create the order.
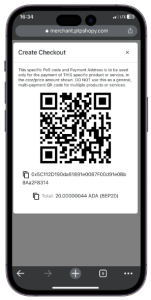
4. Preview QR Code and Receive Address
Upon completing the order, you will receive a QR code and a receive address. The QR code is what is to be presented to customers for scanning, enabling them to proceed with the purchase using their cryptocurrency wallet.
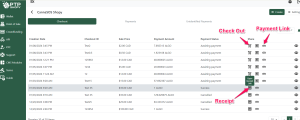
For online stores, access the ‘Share’ tab and copy the payment link. You can conveniently add this link to your invoices, providing customers with a straightforward way to make payments online.
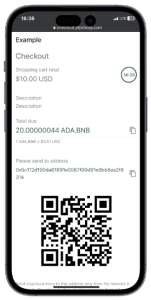
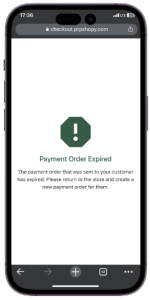
5. Preview Invoice
Click on the shopping cart under ‘Share’ to view the merchant store, amount due and the time remaining. If payment was not made within the allocated time limit and the link expires, you can resend the link, however this time, the amount due will be updated to the current market price of the cryptocurrency.
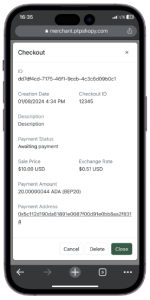
6. Confirm Payment details
To ensure that the checkout information is correct, return to the ‘Checkout’ section and click on the order. The checkout ID, creation date, service, and currency payment account will be displayed. If the customer has paid the full amount, it will be shown on the payment tab. If the customer has made a partial payment, it will be shown on the unidentified payments tab.
7. Managing Unidentified Payments
When faced with unidentified payments, you have the authority to take appropriate action. You can either associate the payment with an existing sale order, create a new order to accommodate the unpaid amount, or opt for a refund. If the created sales order remains unpaid and expires, you can either close or delete it.
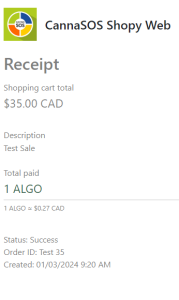
8. How do I print or send a Receipt to a customer?
Click on the Receipt icon and a Receipt will appear in the new window that opens. You can send it by e-mail or print it out.